I’ve been delinquent in updating everyone on the status of my kitten chia. I’m back on the wagon for now and should have some new pics up. We’ve got some serious green chia going on.
Archive for the ‘Kitten Chia’ category
Fail
January 7, 2009Day Eight
January 1, 2009Success! I see fields of green…


Day Seven
December 31, 2008

*Photos Courtesy of Sheeva Ghassemi
Day Six
December 30, 2008


Day Five
December 29, 2008


Behind the Chia
December 28, 2008The Chia Pet Story: How Do They Do It?
Since there isn’t any major growth breakthroughs yet, I thought I’d discuss the elaborate process that is required to bring a Chia Pet to life.
Chia Pets are handmade by artisans using techniques passed down from the Indians of ancient Mexico. Each Chia Pet is sculpted from rich terra-cotta clay. The multi-stage process takes several days for shaping, drying, kiln firing and finishing.
Chia (salvia hispanica) was popular among the Aztecs. It was eaten as food and included in medicines. Chia seeds were ground into flour and pressed for oil.
I don’t know if I believe all that, but it sounds nice.
How to Make a Unique Chia Pet: Apparently you can make your own, homemade Chia Pet using a woman’s nylon
Day Four
December 28, 2008Unfortunately nothing super exciting, but it does look like a few of the seeds have stems growing from them, however, its not very visible.
The box said 3 to 5 days and we are dangerously coming close to a breach of warranty here.
Day Three
December 27, 2008

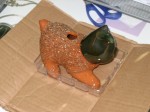
As you can see the front of the kitten chia is seriously lacking in seed coverage. Also the tray fills up with water very quickly.
Day Two
December 26, 2008After a long 24 hours (actually more like 18) the chia kitten was ready for seed implantation.

Gel-like paste of seeds

Chia Pet fully soaked
Step 3
Spread water-soaked Chia seeds on animal.

Beginning with a teaspoon

Having to spread seeds with my hands

Sticky Icky

It's a lot messier than the commercial made it look
Ready – Set – Grow!

Seeds should sprout in 3-5 days (we shall see)
Alright, so after that messy debacle it’s time to chart the Chia Pet’s progress.
I’m supposed to keep the chia pet full of water (see hole) and make sure that it gets the appropriate sunlight.
Hopefully the seeds take, if not we can always try again.
Day One
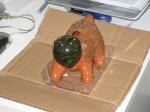
December 25, 2008Step One
Soak clay kitten in water overnight (24 hours).

Kitten Chia Submerged in Water
Step Two
Mix 2 teaspoons of Chia Seeds and 1/4 cup of water. Stir well to moisten al seeds. Allows seeds to set for 24 hours. The seeds will form a thick, gel-like paste which will help seeds adhere to your Chia Planter.

2 Teaspoons of Seeds mixed wit 1/4 cup of water to soak overnight
The Chia and seeds must be soaked for overnight before we can move on to the spreading (ugh!). The commercials make it seem so much easier, but hopefully this will be gratifying.
